Getting Started with Telnyx Voice API
Welcome to the Telnyx Voice API! This guide will walk you through everything you need to start building voice applications with Telnyx, from creating your account to making your first API call.
What You'll Build
In this guide, you'll set up a complete voice application that can make outbound calls and be ready to explore advanced features like AI assistants, speech recognition, and media streaming.
Prerequisites
Before you begin, make sure you have:
- A computer with internet access.
- Basic understanding of REST APIs and webhooks.
- A development environment with your preferred programming language (we'll provide examples in multiple languages).
- (Optional) A tool like ngrok for local webhook testing.
Create Your Telnyx Account
To get started with the Voice API, you'll need a Telnyx account. Follow our account creation guide to set up your account and access the Mission Control Portal.
Obtain Your API Key
To authenticate your Voice API requests, you'll need an API key. Follow our API key creation guide to generate and securely store your API key.
Set Up Your Webhook URL
To receive real-time events from the Voice API, you'll need to set up webhooks. Follow our webhook fundamentals guide to configure your webhook URL and create a handler for Voice API events.
Buy a Phone Number
To make calls with the Voice API, you'll need a phone number. Follow our phone number purchase guide to buy a number that will be associated with your Voice API application.
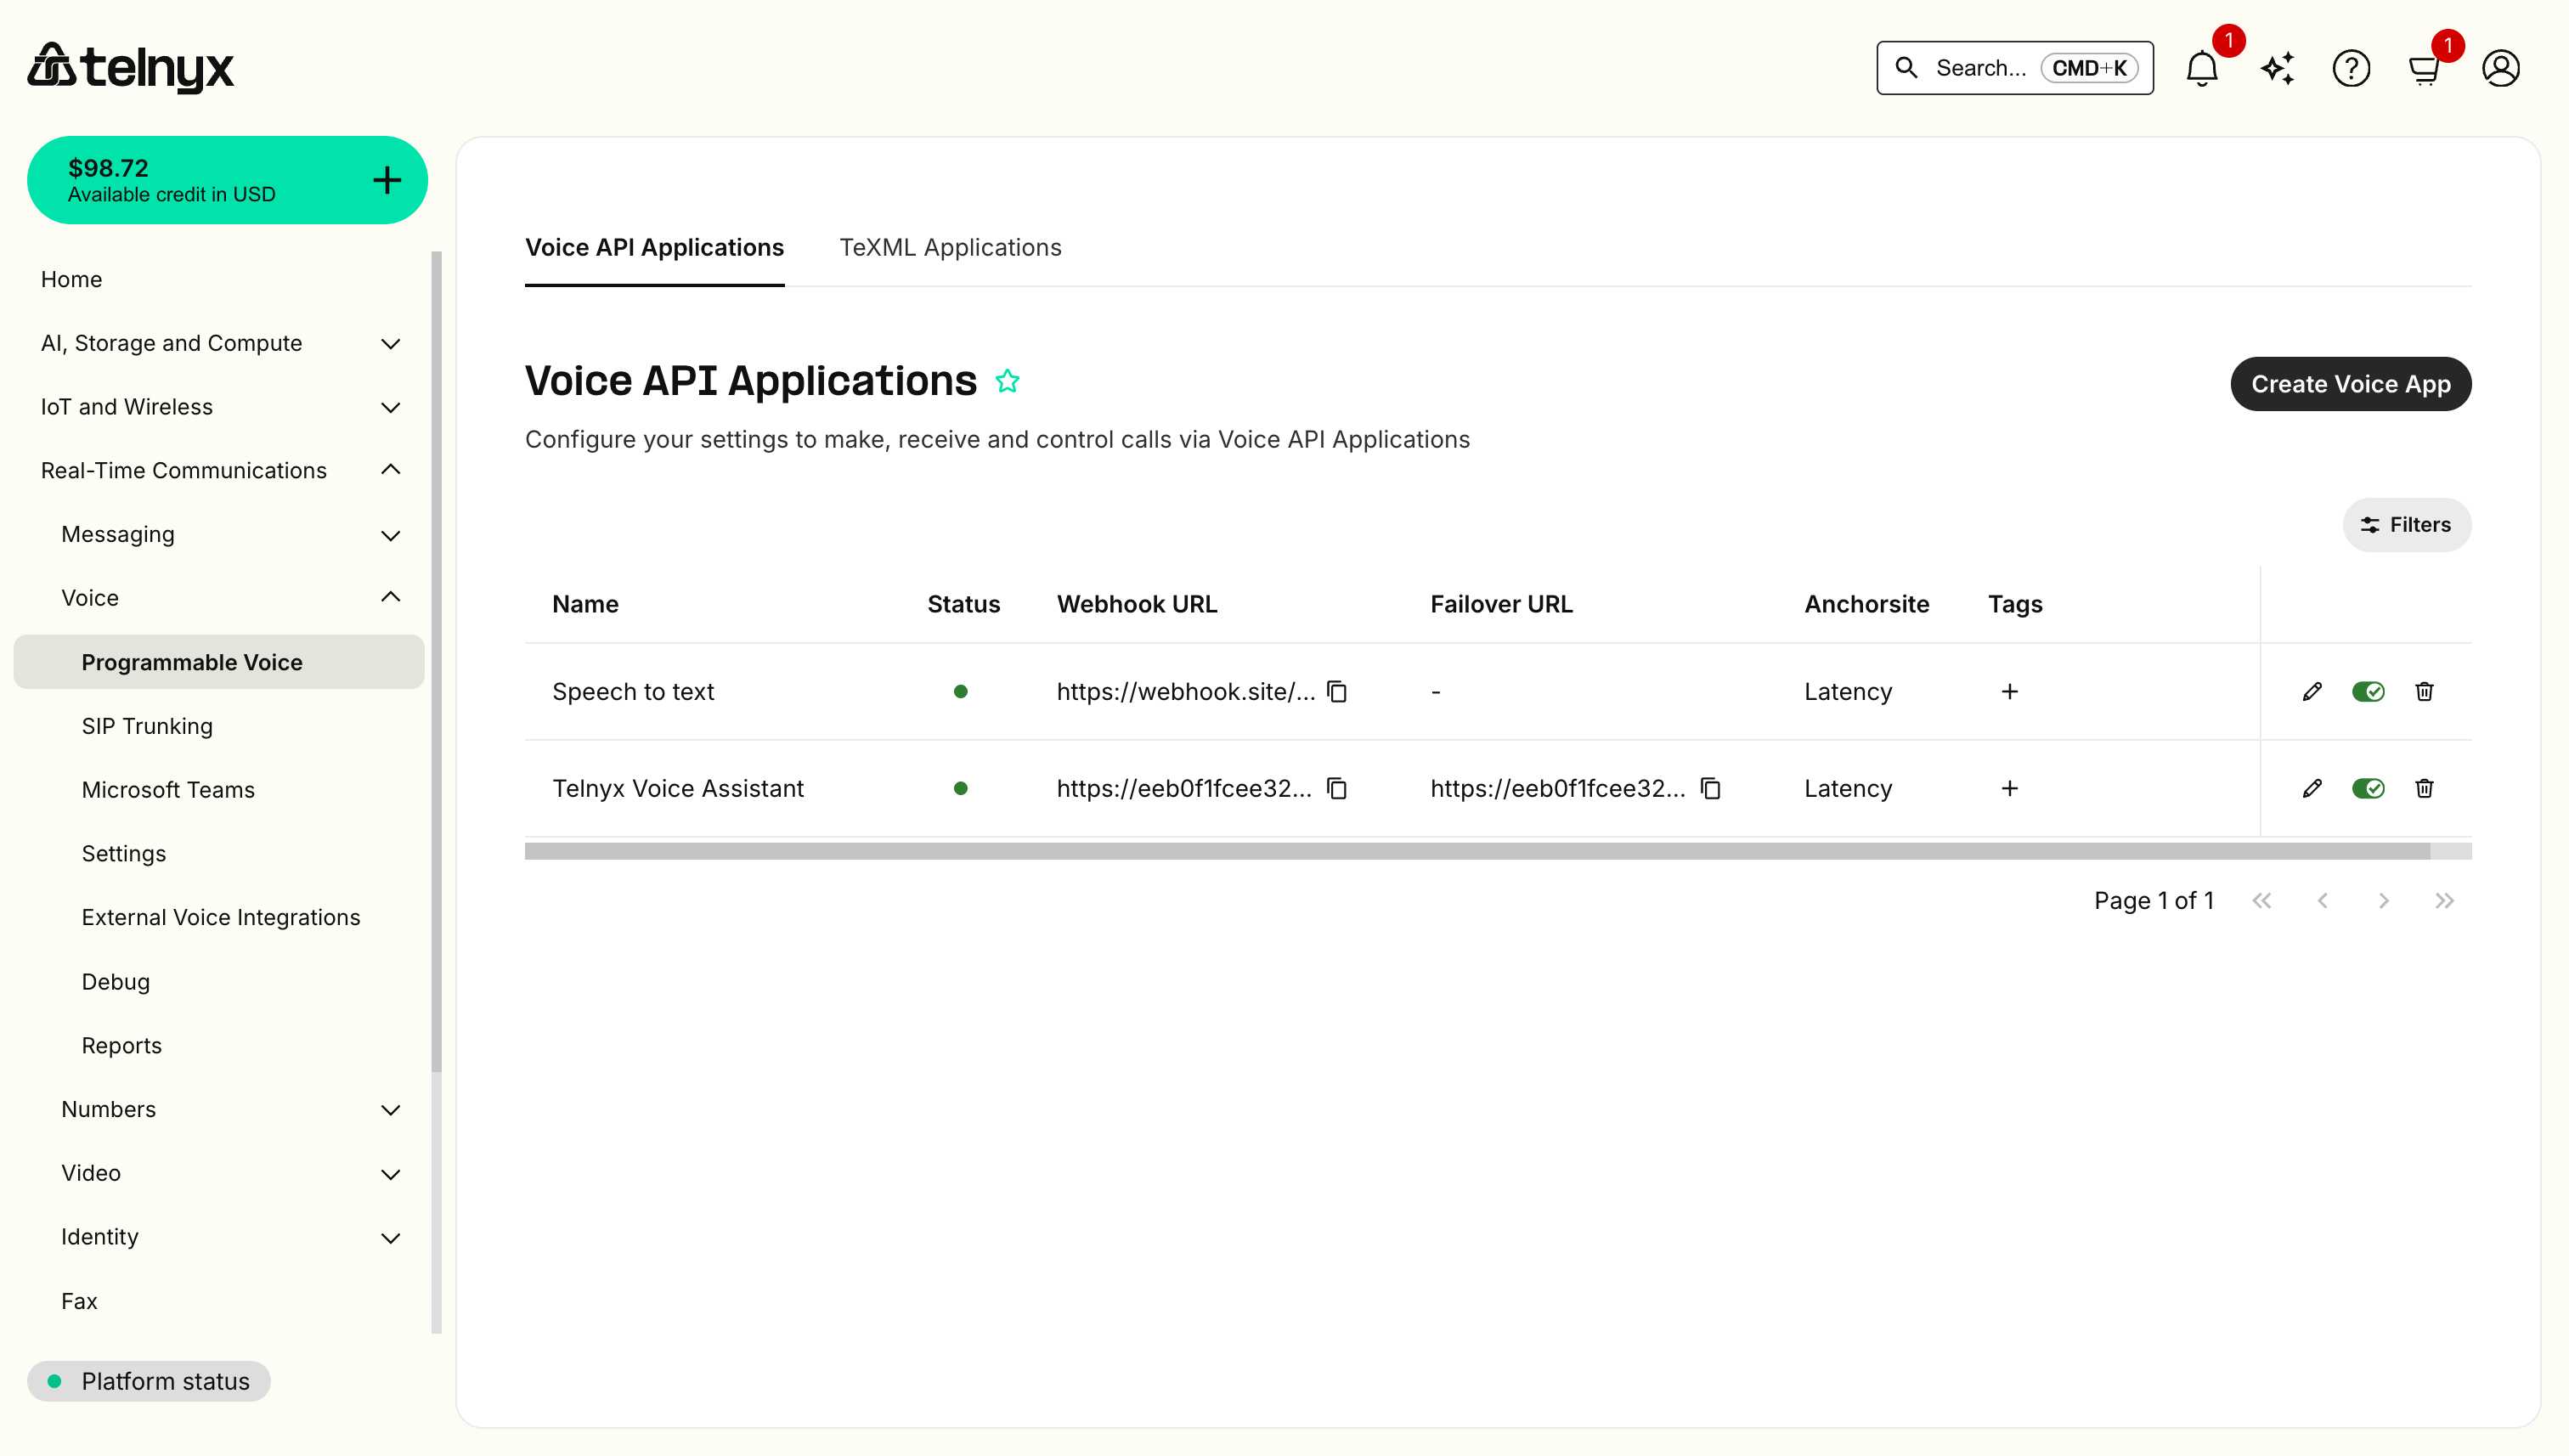
Create a Voice API Application
A Voice API Application defines how Telnyx handles calls to and from your numbers.
Creating Your Application
- In the Mission Control Portal, navigate to Real-Time Communication > Voice > Programmable Voice.
- Click on the Create Voice App button in Voice API Applications tab.

- Configure your application and click Create.
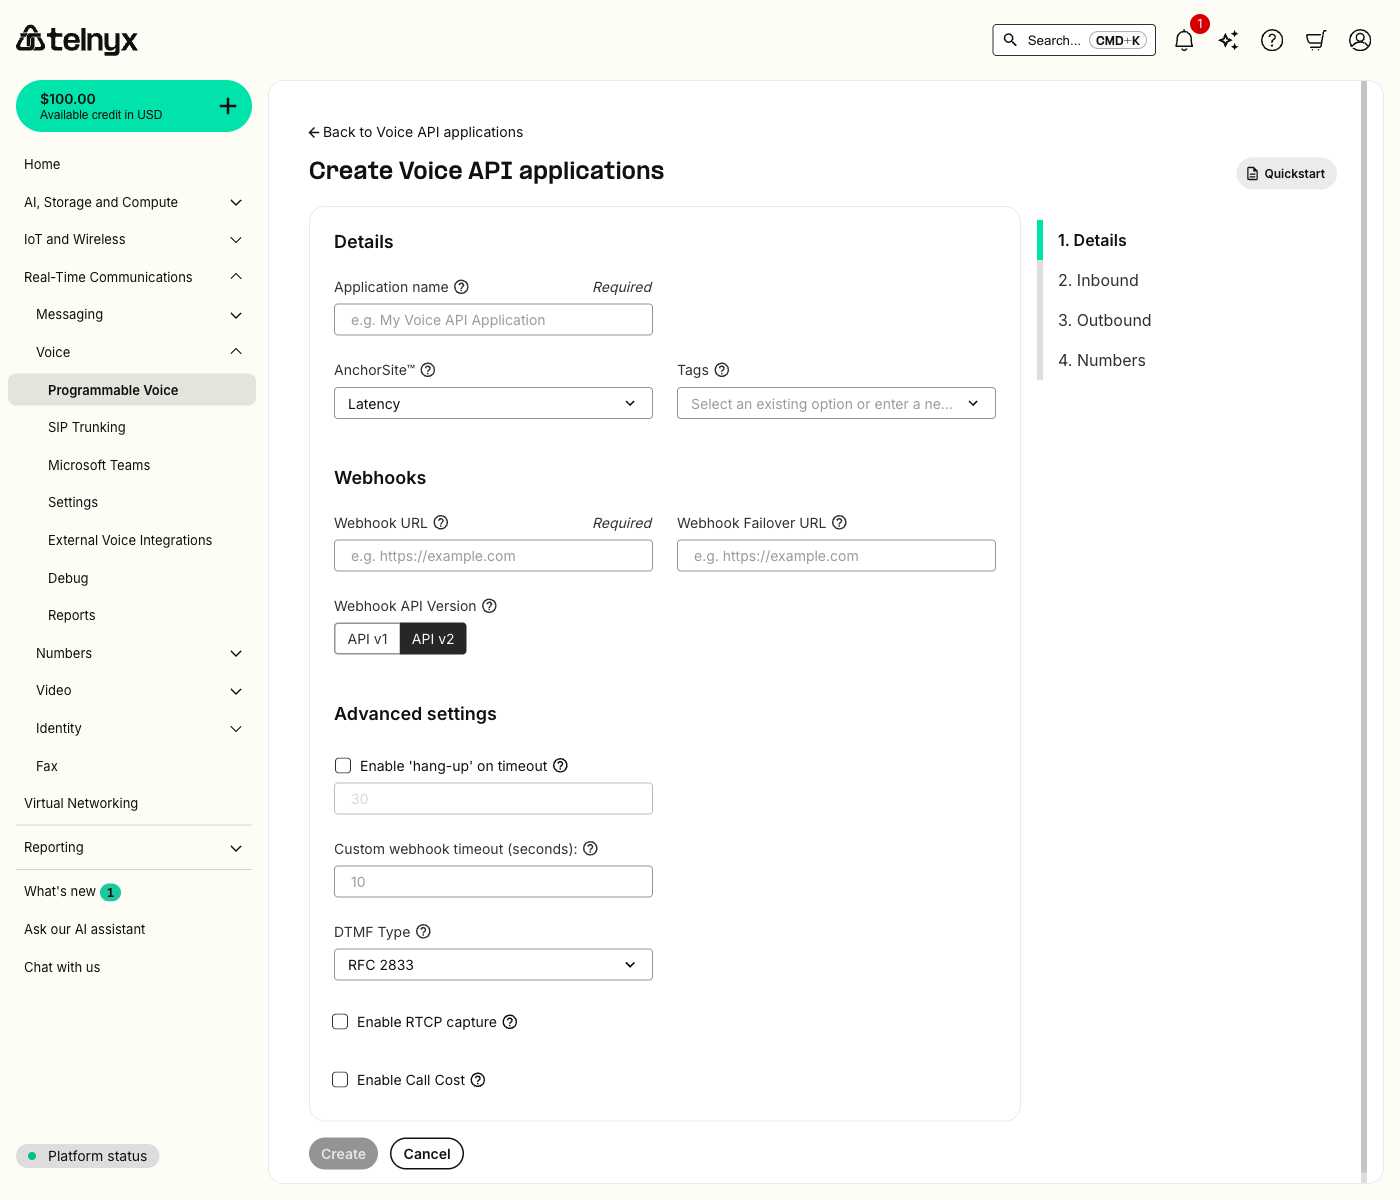
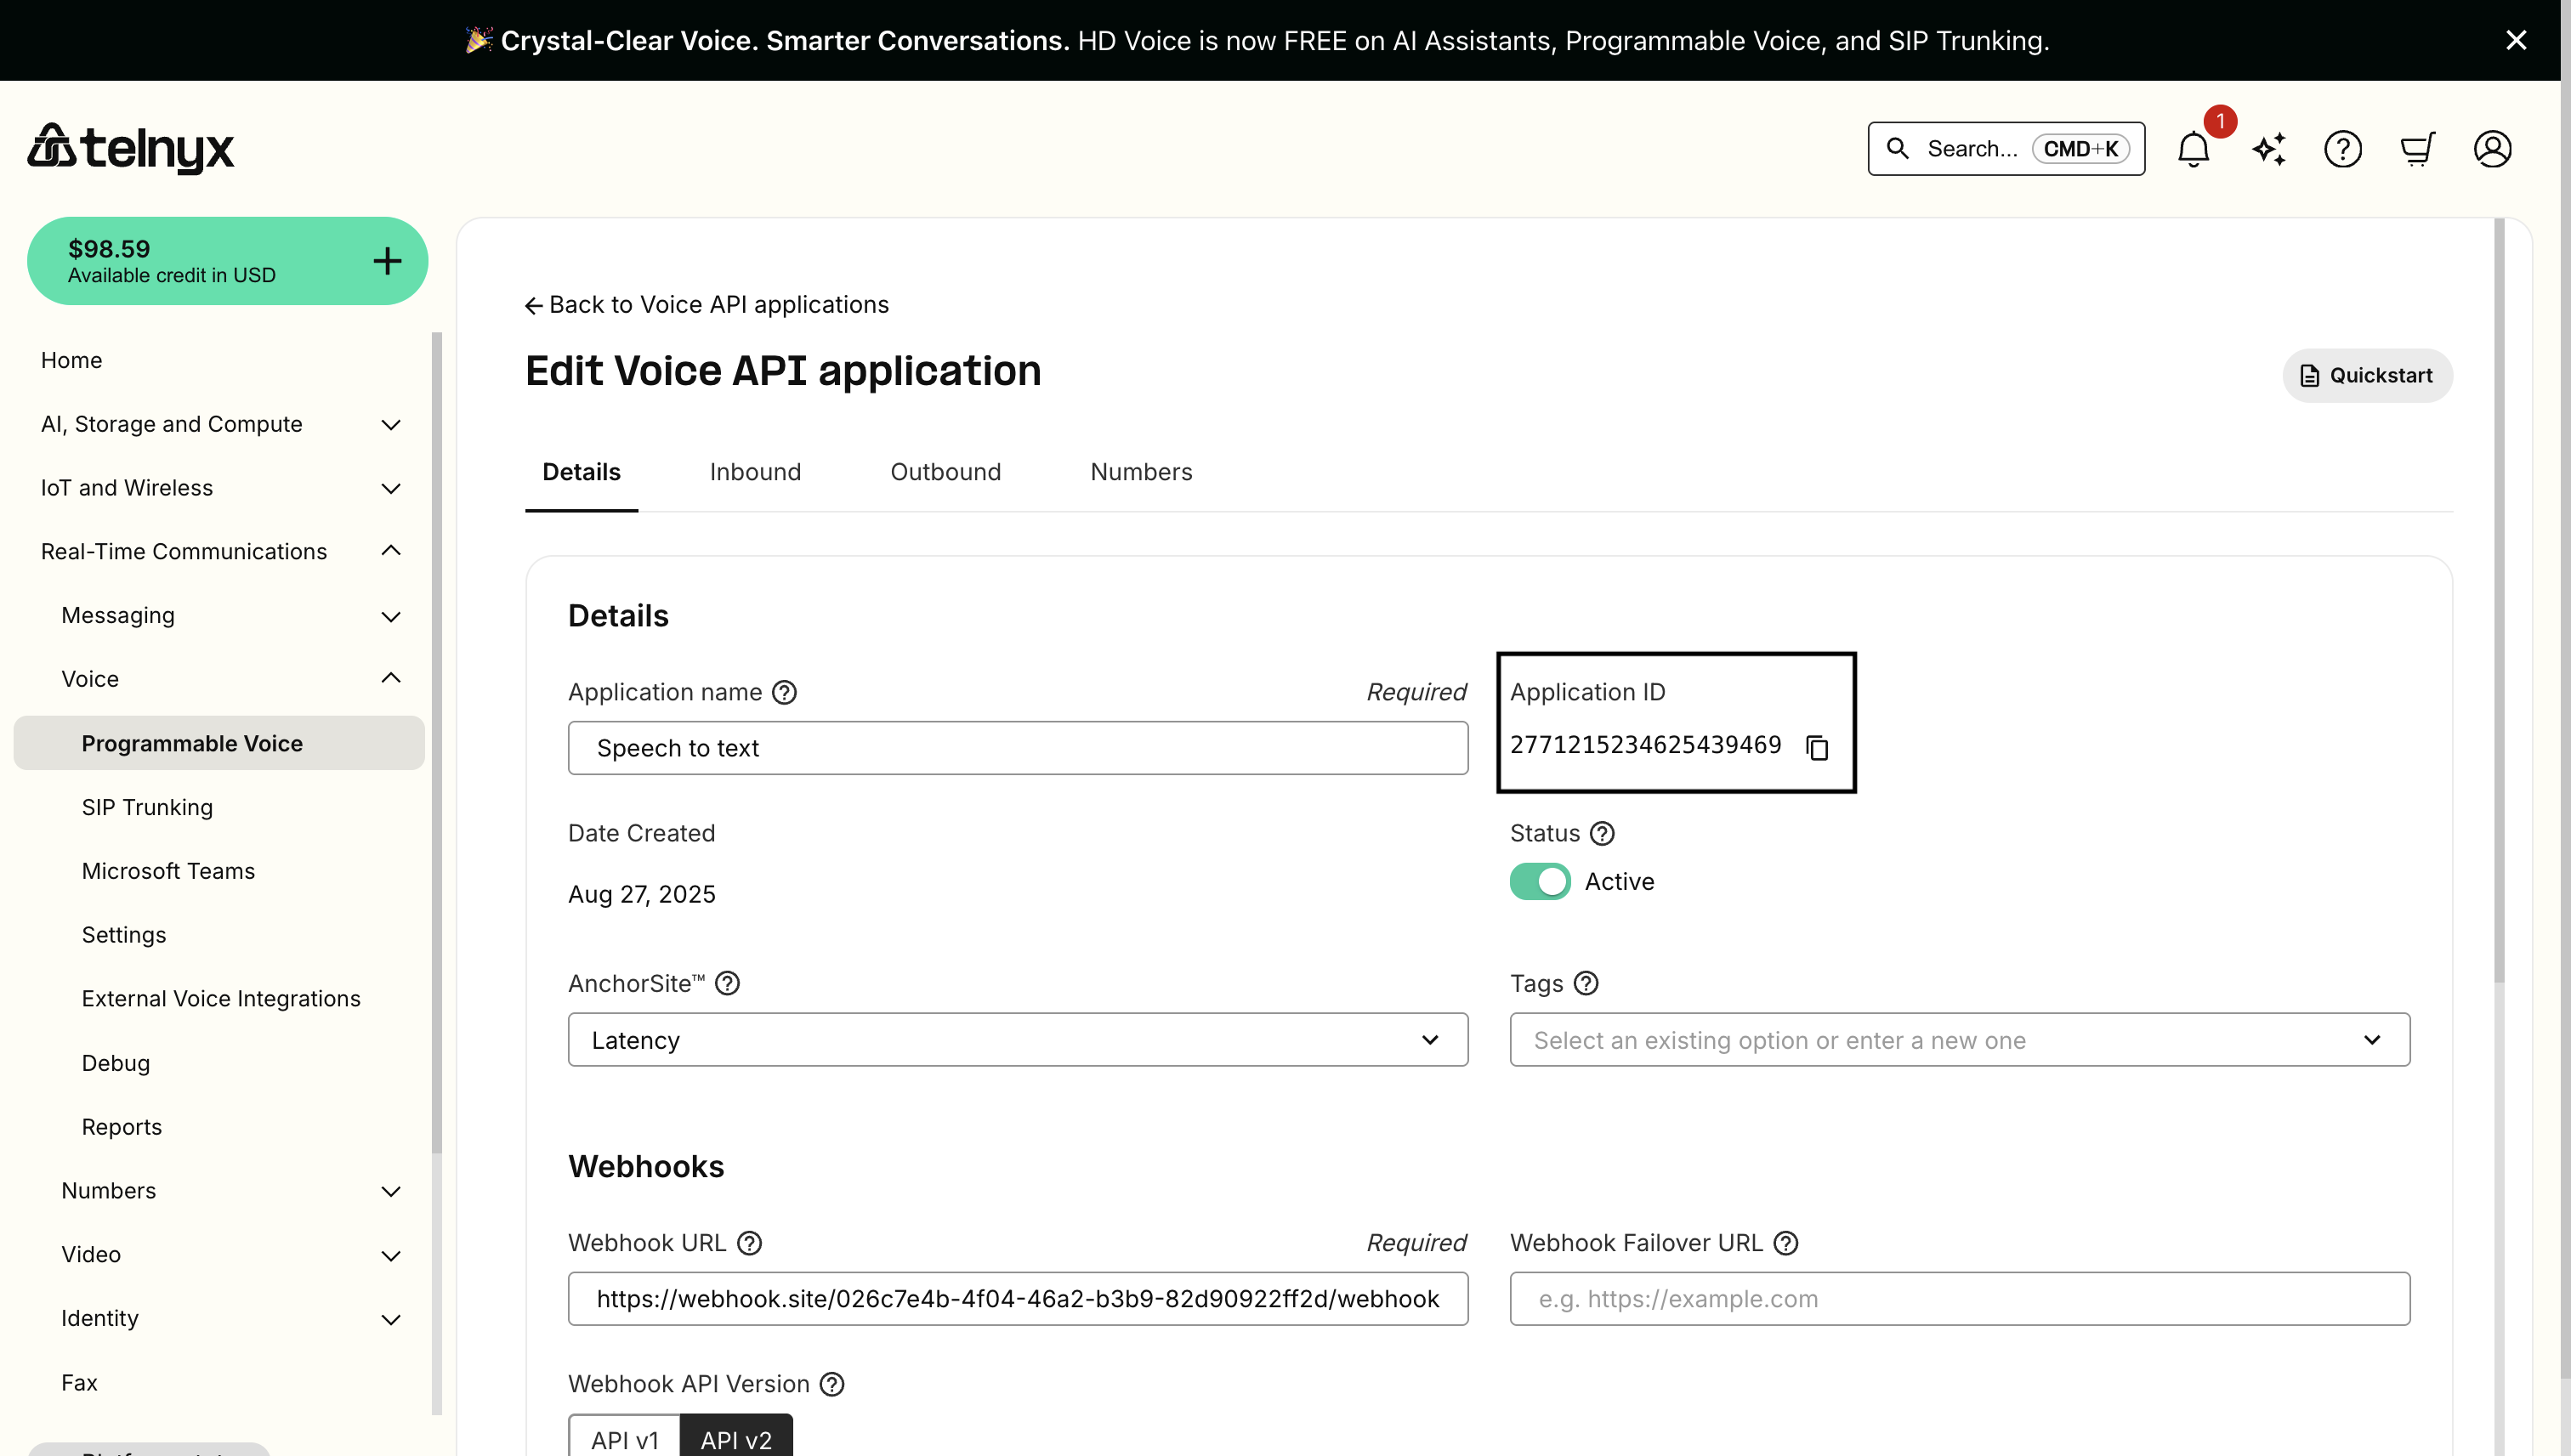
Application configuration options
- Application name: A user-assigned name to help manage the application.
- Webhook URL: Where Telnyx sends call events, must include a scheme such as 'https'.
- Webhook failover URL: Backup URL used if primary webhook URL fails after two consecutive delivery attempts.
- Webhook API version: Determines which webhook format will be used, API v1 or v2 (v2 recommended).
- Anchor site: Routes media through the site with the lowest round-trip time to your connection.
- Tags: Create or remove tags associated to this application for organization.
- Enable hang-up on timeout: Hang up calls if no response to webhook within specified time.
- Custom webhook timeout: Time in seconds to wait for webhook response before timing out.
- DTMF type: Touch-tone digit handling method (RFC 2833 recommended).
- Enable call cost: Receive cost information webhooks for billing and reporting.
- Configure the Inbound settings.
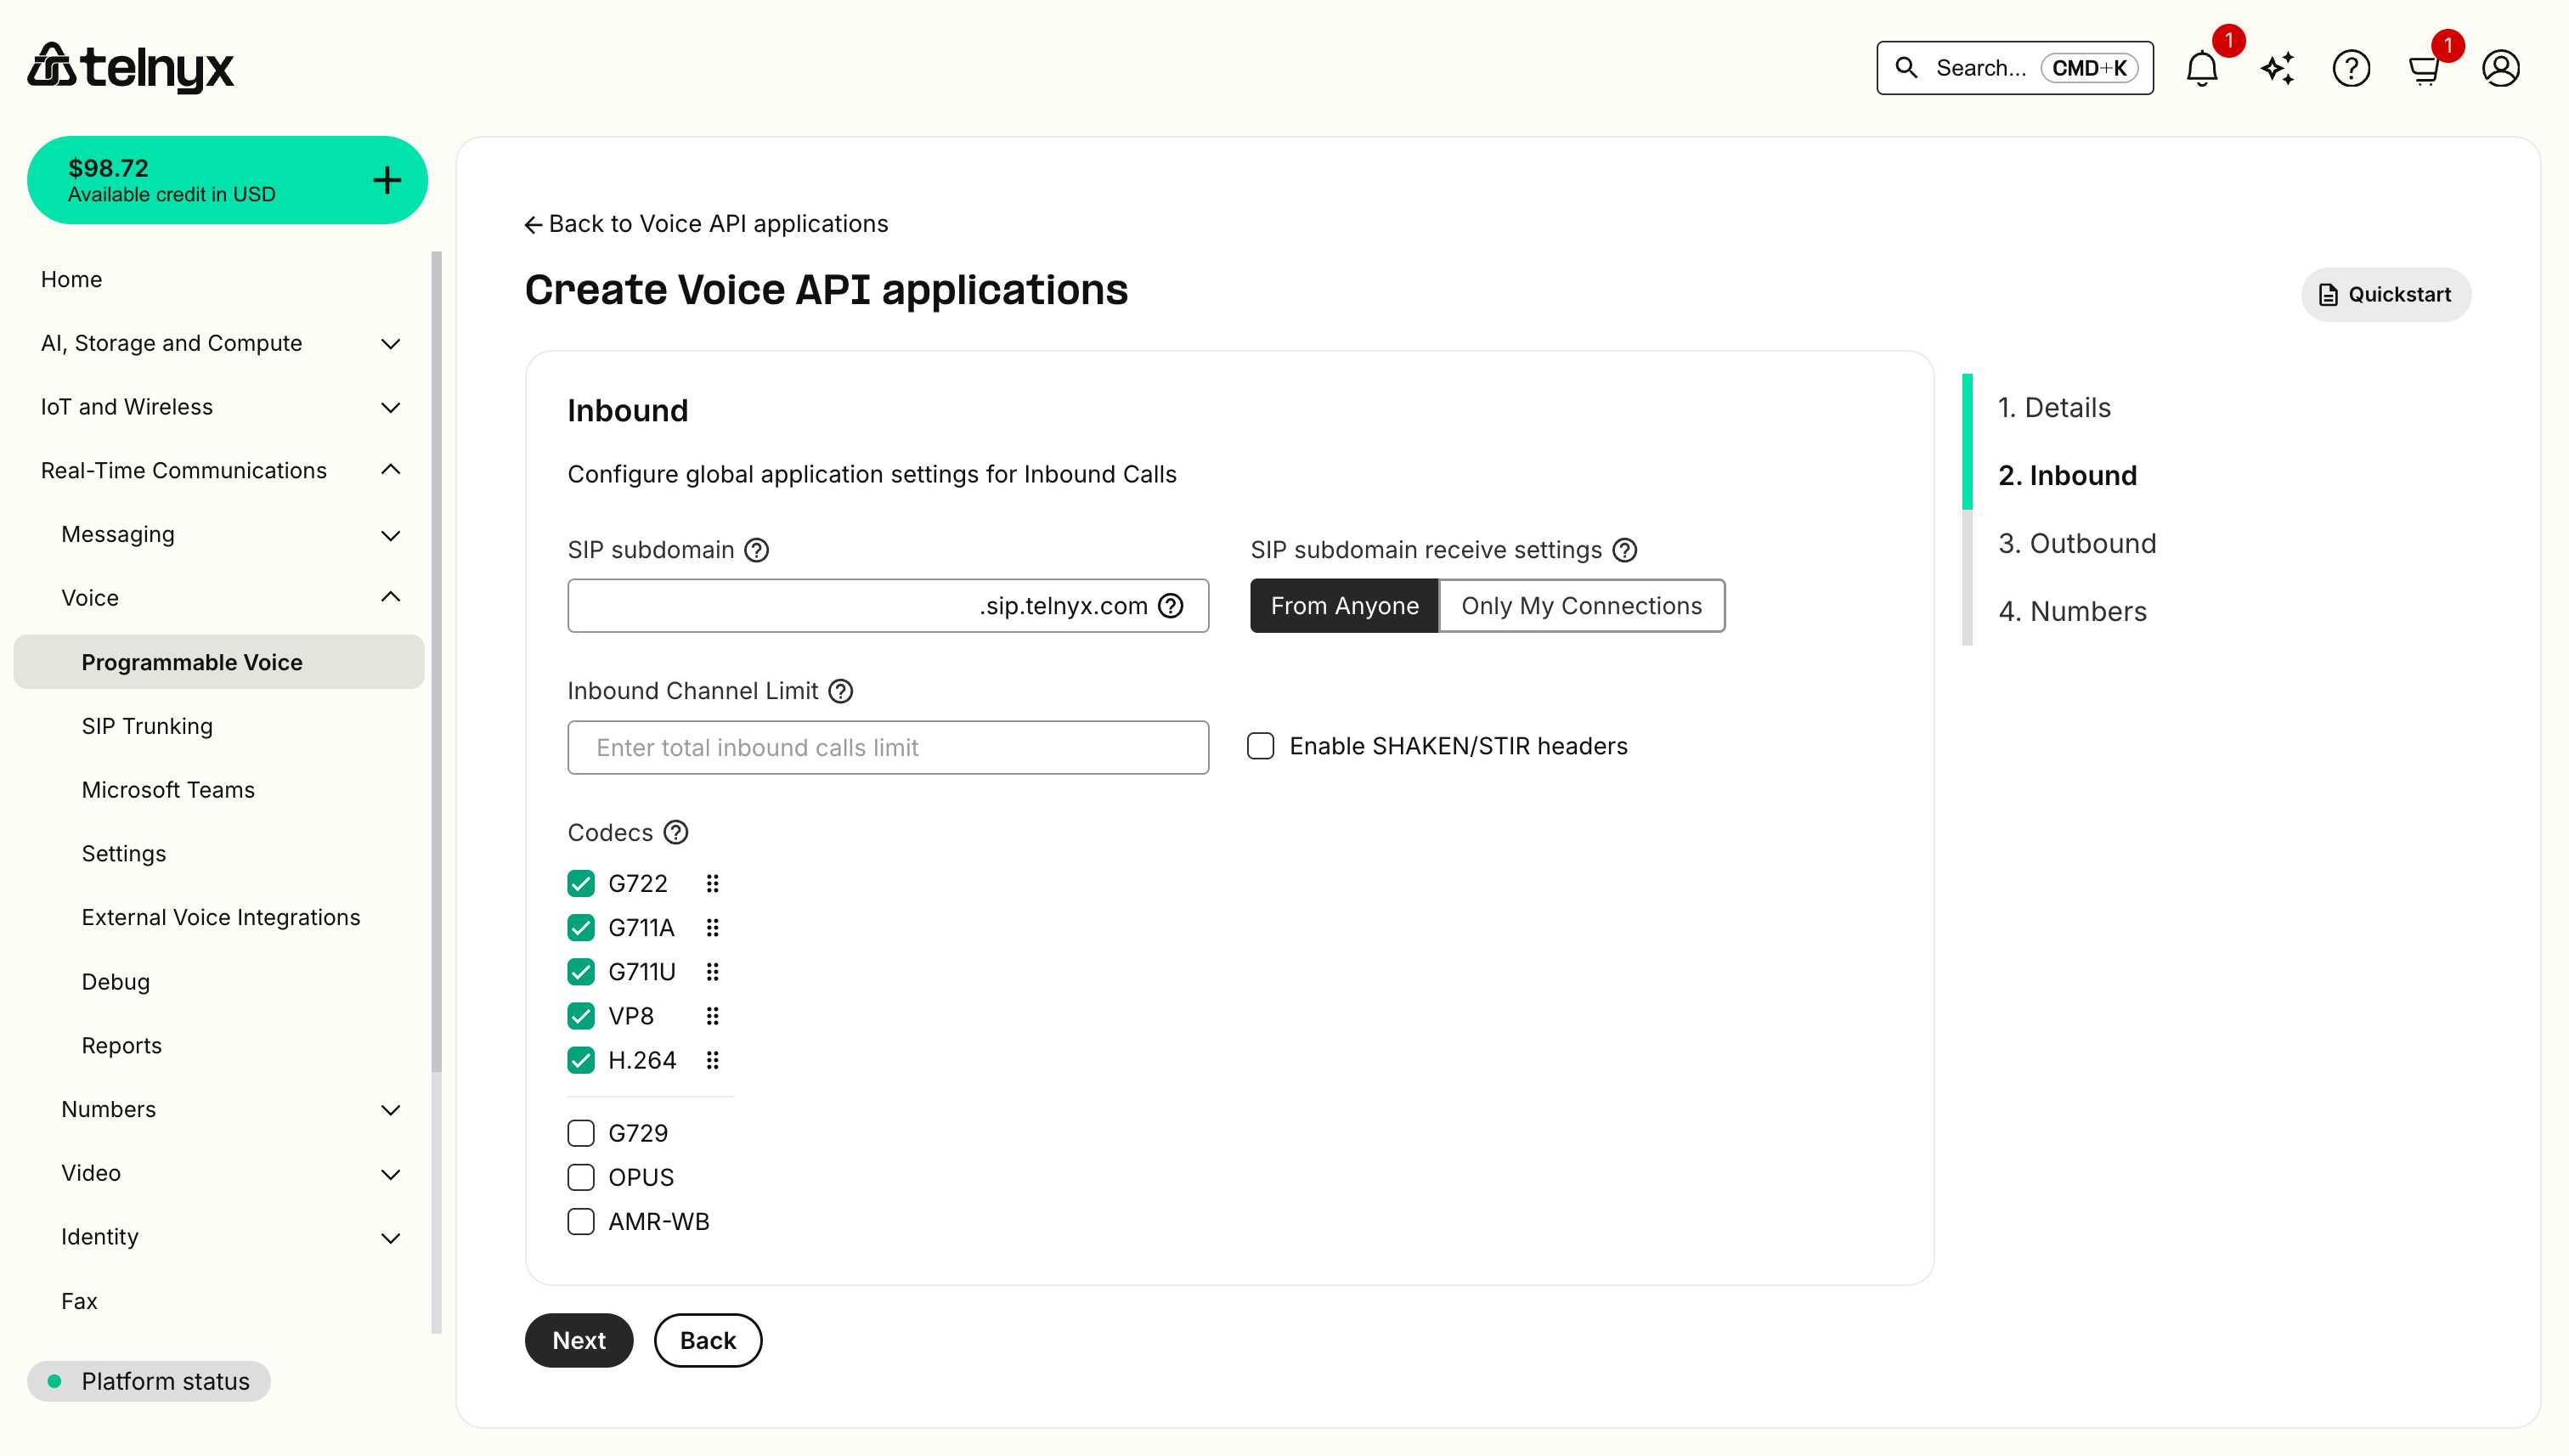
Inbound configuration options
- SIP subdomain: Create a custom SIP address (like
yourname.sip.telnyx.com) to receive calls from any SIP endpoint. - SIP subdomain receive settings: Choose who can call your SIP subdomain - anyone on the internet or only your connections.
- Inbound channel limit: Set the maximum number of simultaneous inbound calls allowed for this application.
- Enable SHAKEN/STIR headers: Add call authentication headers to help verify caller identity and reduce spoofing.
- Codecs: Select which audio and video formats your application will support for optimal call quality.
- Configure the Outbound settings.
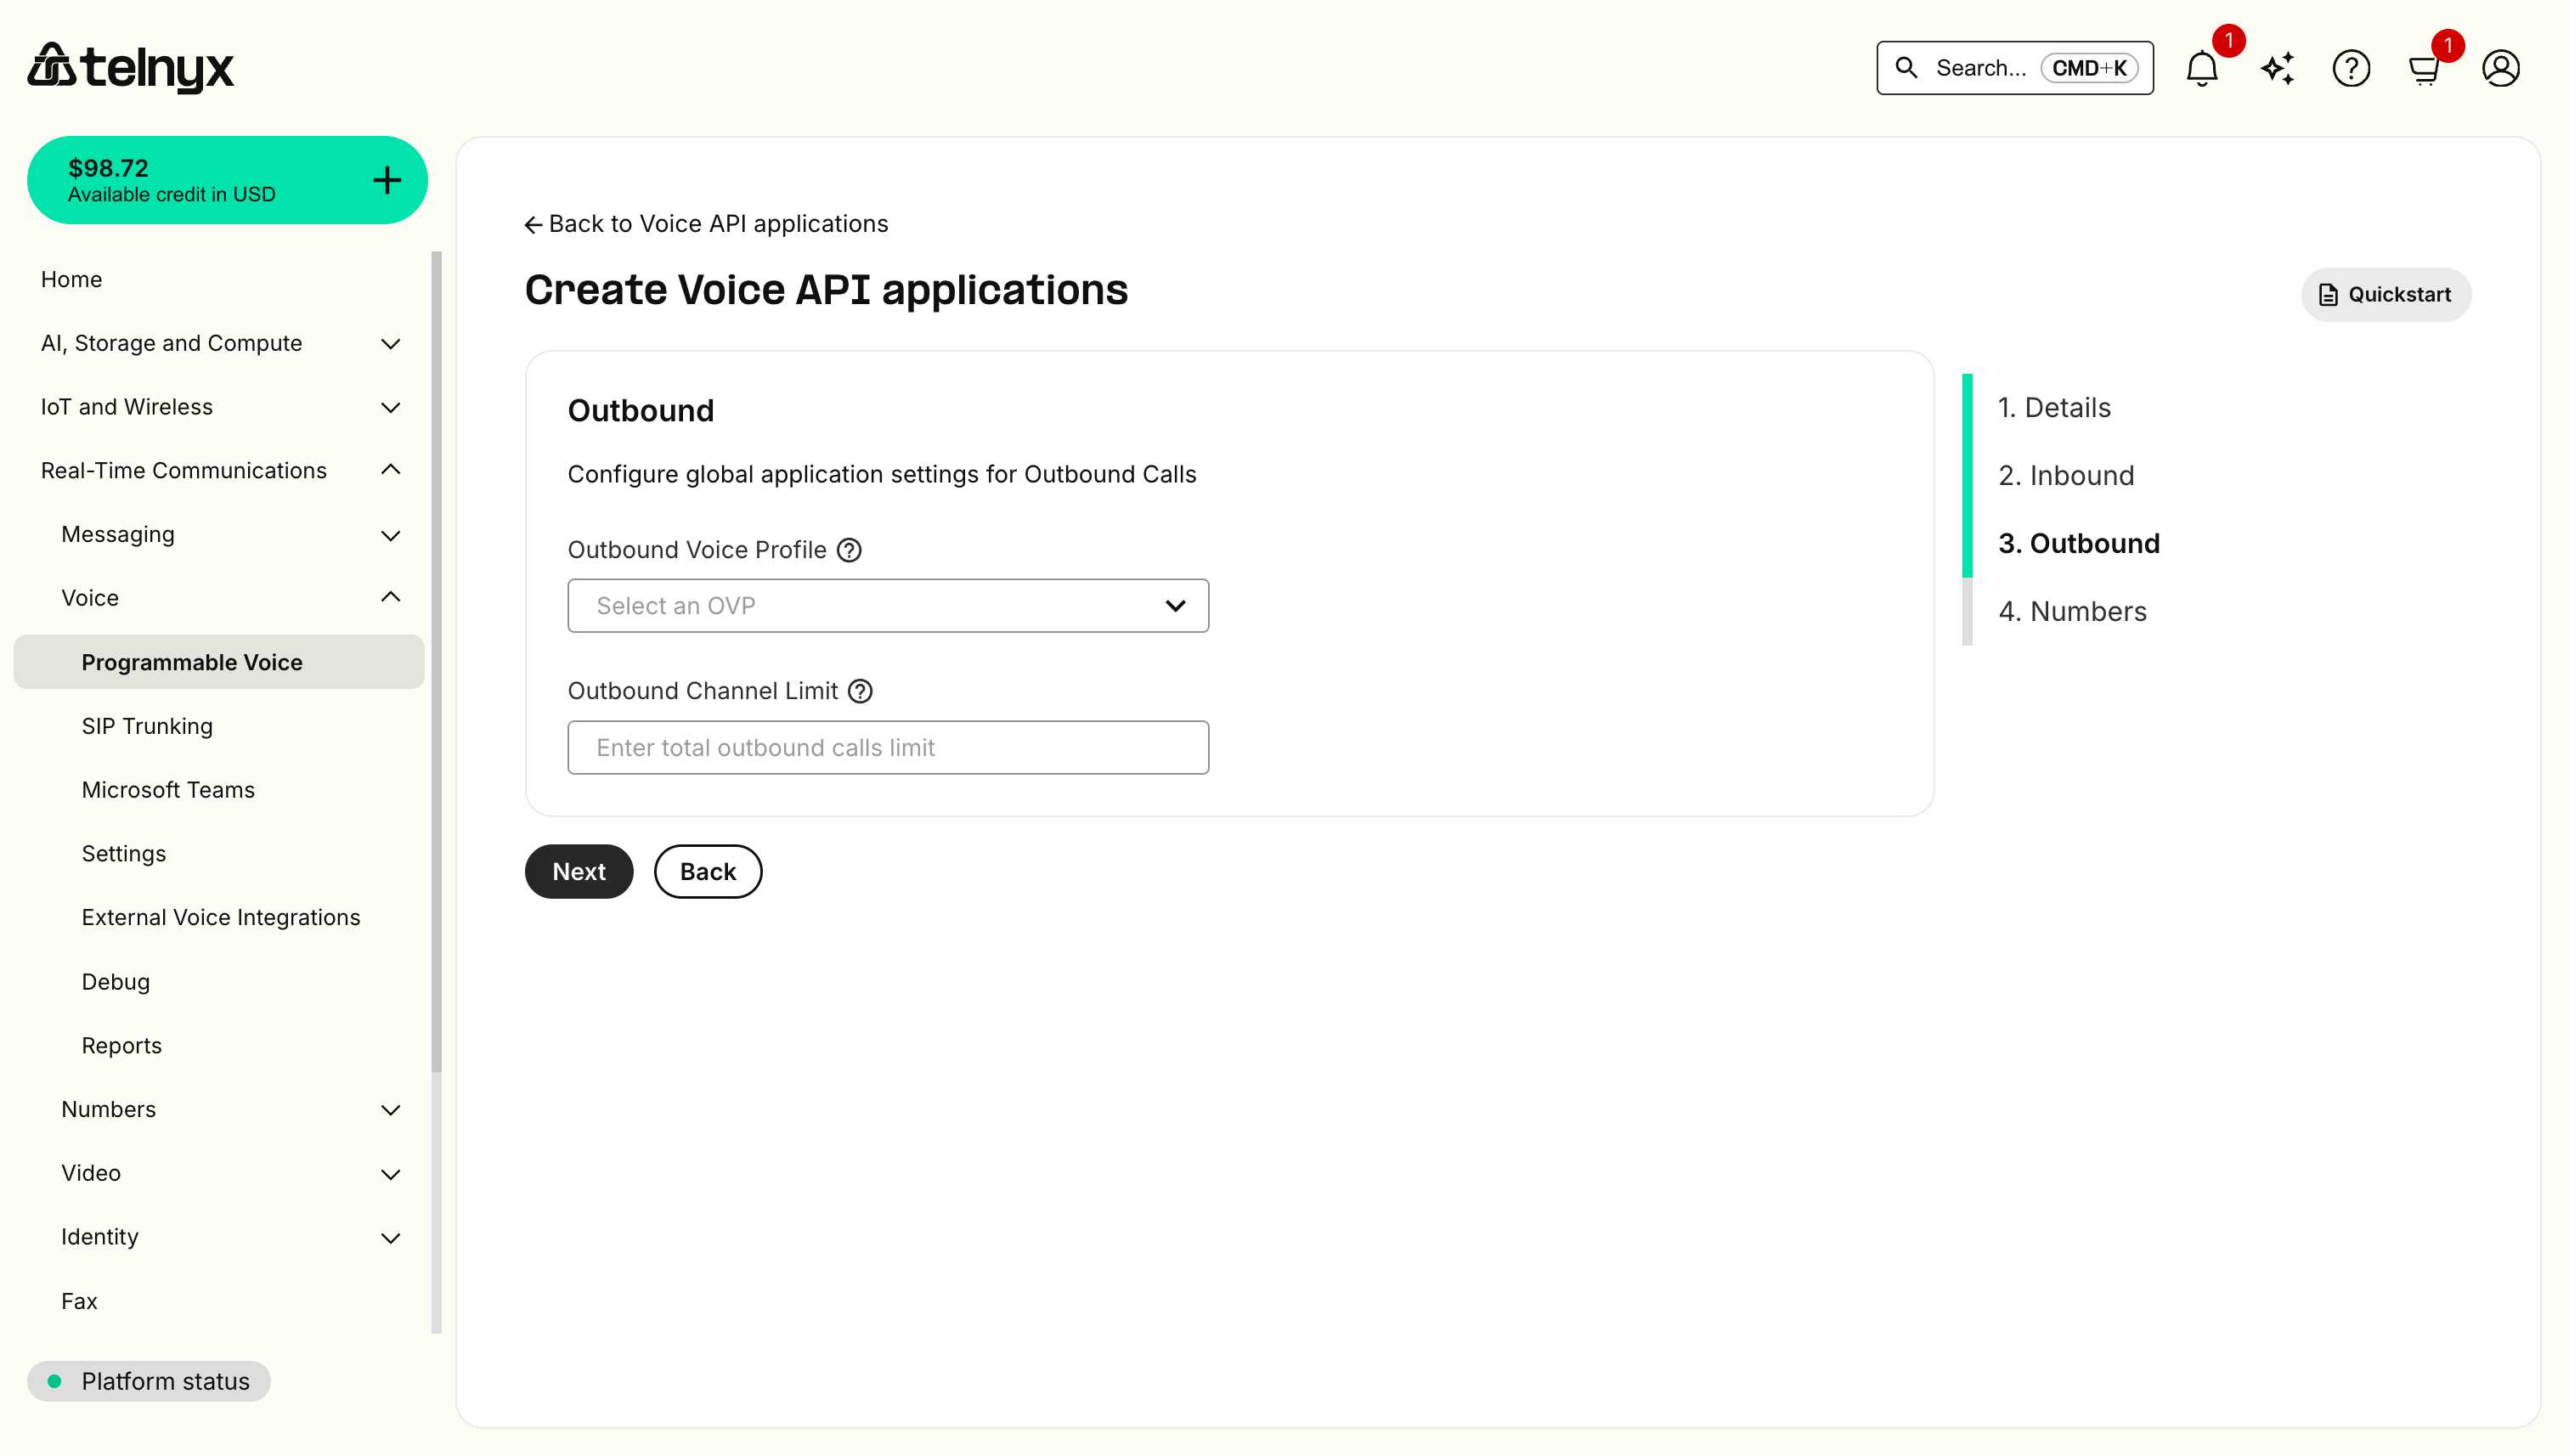
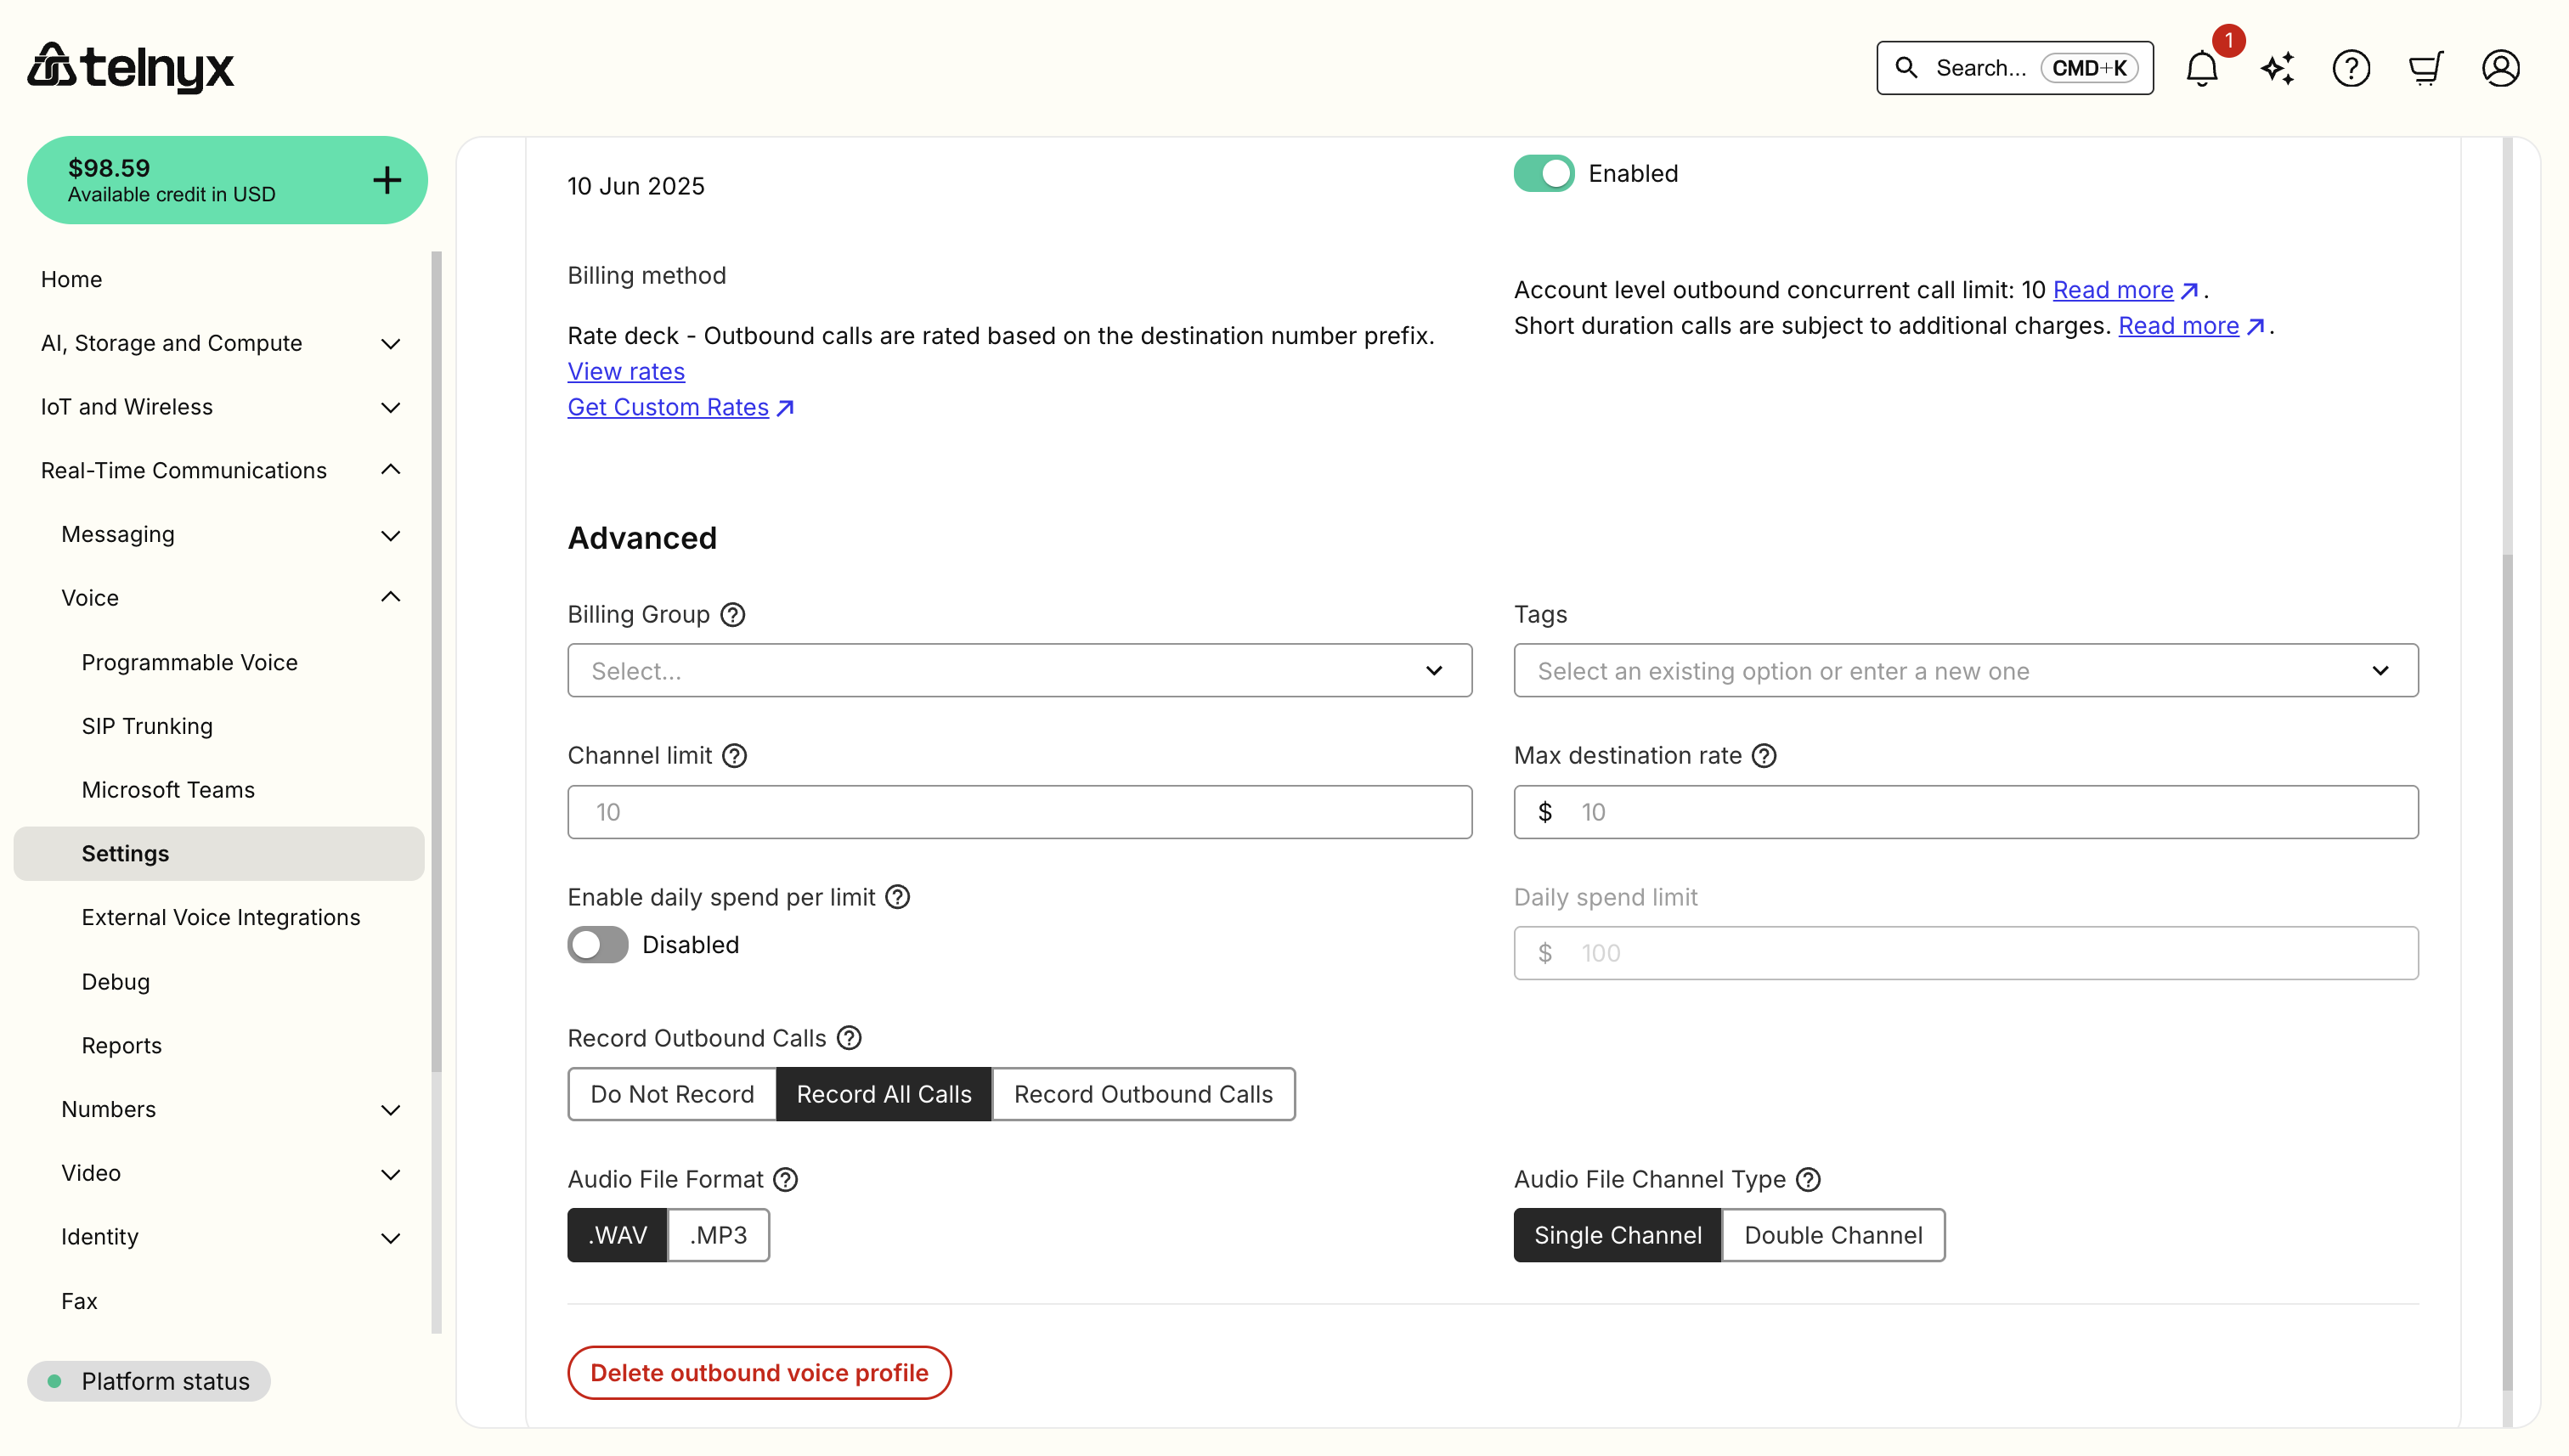
Outbound configuration options
- Outbound voice profile: Identifies the associated outbound voice profile for call routing and billing.
- Outbound channel limit: Sets the maximum number of simultaneous outbound calls allowed for this application.
- Configure the Numbers settings.
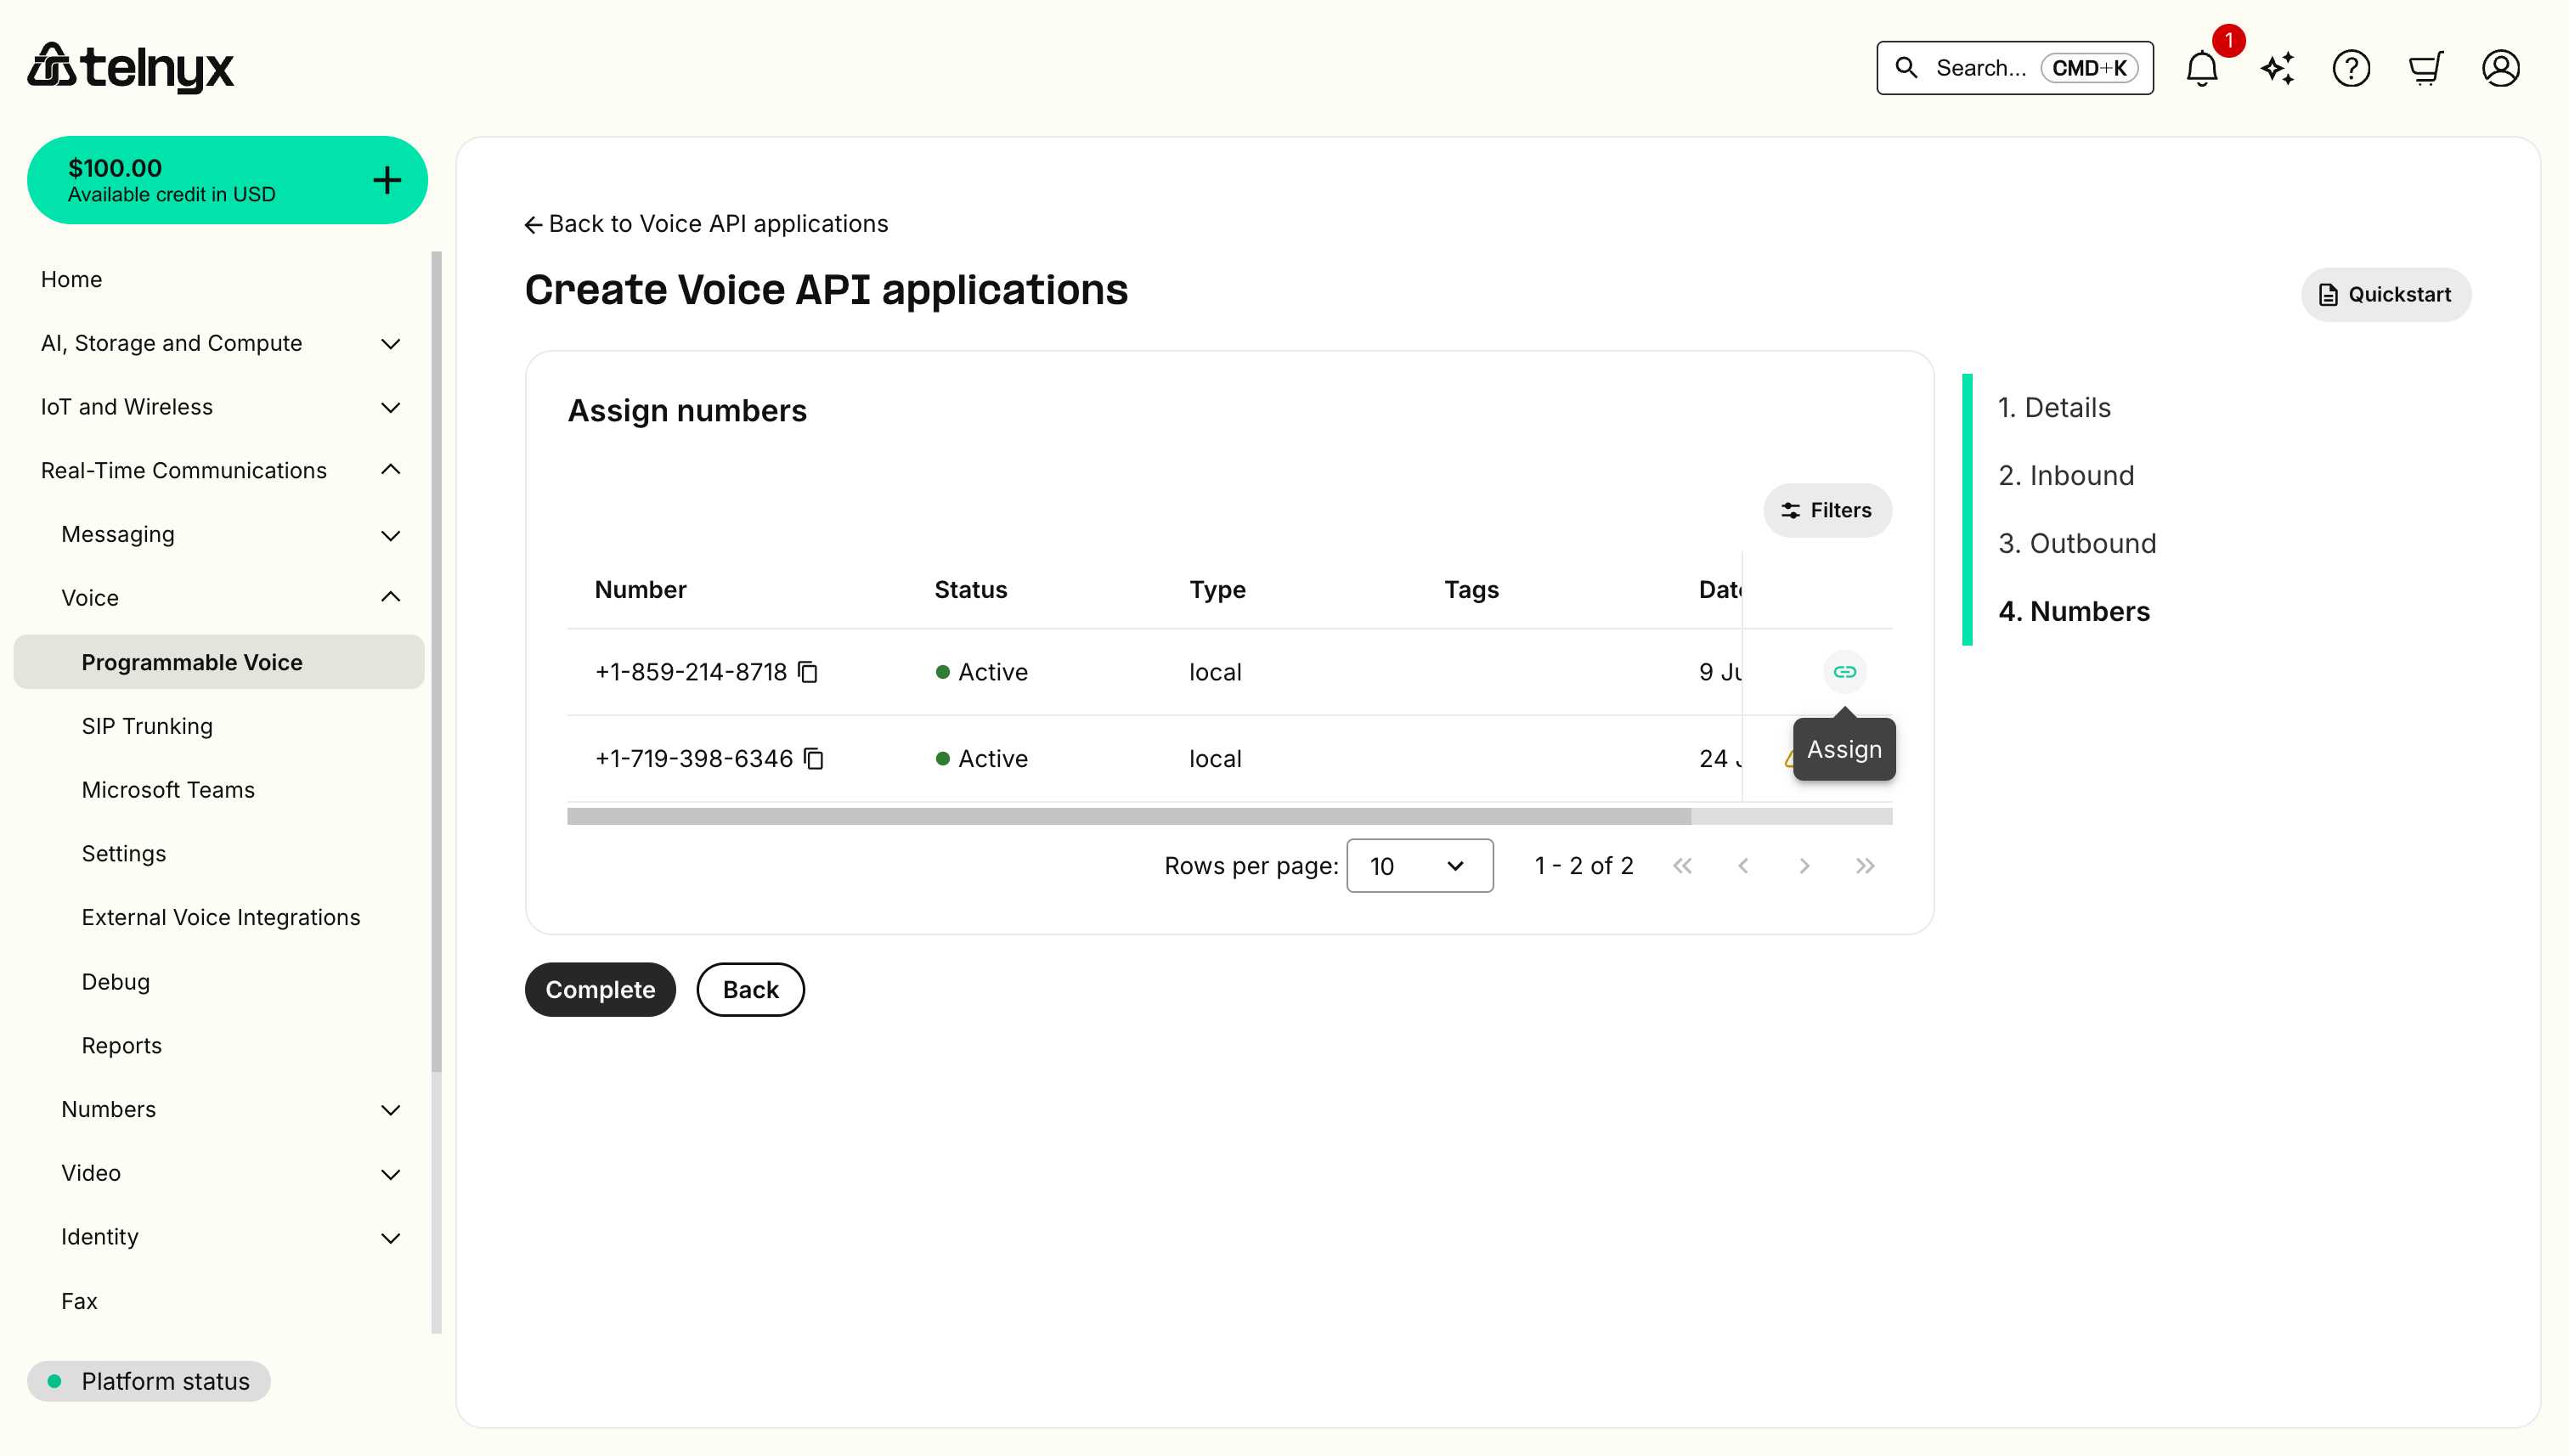
Numbers configuration
This section displays your purchased phone numbers that can be assigned to this Voice API application. You can view number details including status, type (local/toll-free), and purchase date, then select which numbers to associate with your application for handling inbound and outbound calls.
- Click Complete, and congratulations! You just created a Voice API app. It will be listed under your Voice API Applications section.
Your First Voice API Call
Congratulations! 🎉 You've successfully set up everything needed for your Voice API application. Now comes the exciting part – let's make your first outbound call and bring your application to life!
Making an Outbound Call
Replace the placeholders with your actual values:
your_api_key: Your Telnyx API key from the API key section above.your_phone_number: The number you purchased above.destination_number: The number you want to call.connection_id: Your connection_id (which is the Application ID) from your Voice API Application details page.
cURL
curl --location 'https://api.telnyx.com/v2/calls' \
--header 'Accept: application/json' \
--header 'Content-Type: application/json' \
--header 'Authorization: Bearer your_api_key' \
--data '{
   "to": "+1234567890",
   "from": "your_phone_number",
   "connection_id": "your_connection_id",
   "command_id": "unique-command-id-123"
}'
Node.js
const axios = require('axios');

const makeCall = async () => {
  try {
    const response = await axios.post(
      'https://api.telnyx.com/v2/calls',
      {
        to: '+1234567890',
        from: 'your_phone_number',
        connection_id: 'your_connection_id',
      },
      {
        headers: {
          'Authorization': 'Bearer your_api_key',
          'Content-Type': 'application/json'
        }
      }
    );
    console.log('Call initiated:', response.data);
  } catch (error) {
    console.error('Error:', error.response.data);
  }
};

makeCall();
Python
import requests

url = "https://api.telnyx.com/v2/calls"
headers = {
    "Authorization": "Bearer your_api_key",
    "Content-Type": "application/json"
}
data = {
    "to": "+1234567890",
    "from": "your_phone_number",
    "connection_id": "your_connection_id",
}

response = requests.post(url, json=data, headers=headers)
print("Call initiated:", response.json())
Understanding the Call Flow
When you make a call, here's what happens:
- Call Initiated: Telnyx receives your API request and initiates the call.
- Webhook Sent: Telnyx sends a
call.initiatedwebhook to your URL. - Call Progress: Telnyx sends additional webhooks as the call progresses (
call.answered,call.hangup, etc.). - Your Response: When the call is answered, you can use Voice API commands to control it (e.g.,
speak, enabletranscription, startrecording). - Call End: Final webhook (
call.hangup) sent when the call completes.
Example Webhook Sequence
1. call.initiated
{
  "created_at": "2025-09-02T09:17:44.019242Z",
  "event_type": "call.initiated",
  "payload": {
    "call_control_id": "v3:RzaeMnE9ebpGCCfKdbNOC_2nU4JJNFMo3rBCpFhCDphE1yP4-2K8UQ",
    "call_leg_id": "aebb45bc-87dd-11f0-9d4e-02420a1f0b69",
    "call_session_id": "aeb5639a-87dd-11f0-af54-02420a1f0b69",
    "client_state": null,
    "connection_id": "1684641123236054244",
    "direction": "outgoing",
    "from": "+12182950349",
    "occurred_at": "2025-09-02T09:17:43.976123Z",
    "state": "bridging",
    "tags": [
      "single",
      "dual"
    ],
    "to": "+48661133089"
  },
  "record_type": "event",
  "webhook_id": "52c959b6-f6a0-4ccc-ad1f-b76fba2efc6d"
}
2. call.answered
{
  "created_at": "2025-09-02T09:17:59.730714Z",
  "event_type": "call.answered",
  "payload": {
    "call_control_id": "v3:RzaeMnE9ebpGCCfKdbNOC_2nU4JJNFMo3rBCpFhCDphE1yP4-2K8UQ",
    "call_leg_id": "aebb45bc-87dd-11f0-9d4e-02420a1f0b69",
    "call_session_id": "aeb5639a-87dd-11f0-af54-02420a1f0b69",
    "client_state": null,
    "connection_id": "1684641123236054244",
    "from": "+12182950349",
    "occurred_at": "2025-09-02T09:17:59.616122Z",
    "start_time": "2025-09-02T09:17:44.596122Z",
    "tags": [
      "single",
      "dual"
    ],
    "to": "+48661133089"
  },
  "record_type": "event",
  "webhook_id": "c1d5d77c-349e-4f51-beb6-37b5c263e58a"
}
3. call.hangup
{
  "created_at": "2025-09-02T09:18:06.429625Z",
  "event_type": "call.hangup",
  "payload": {
    "call_control_id": "v3:RzaeMnE9ebpGCCfKdbNOC_2nU4JJNFMo3rBCpFhCDphE1yP4-2K8UQ",
    "call_leg_id": "aebb45bc-87dd-11f0-9d4e-02420a1f0b69",
    "call_quality_stats": {
      "inbound": {
        "jitter_max_variance": "63.77",
        "jitter_packet_count": "0",
        "mos": "4.50",
        "packet_count": "329",
        "skip_packet_count": "13"
      },
      "outbound": {
        "packet_count": "0",
        "skip_packet_count": "0"
      }
    },
    "call_session_id": "aeb5639a-87dd-11f0-af54-02420a1f0b69",
    "client_state": null,
    "connection_id": "1684641123236054244",
    "end_time": "2025-09-02T09:18:06.396120Z",
    "from": "+12182950349",
    "hangup_cause": "normal_clearing",
    "hangup_source": "callee",
    "occurred_at": "2025-09-02T09:18:06.396120Z",
    "sip_hangup_cause": "200",
    "start_time": "2025-09-02T09:17:44.596122Z",
    "tags": [
      "single",
      "dual"
    ],
    "to": "+48661133089"
  },
  "record_type": "event",
  "webhook_id": "30aa187c-cad6-4d29-bd52-e7c792f95313"
}
Testing Your Setup
Make a Test Call
- Ensure your webhook handler is running and accessible.
- Use the API to make an outbound call to your mobile phone.
Common Issues and Solutions
| Issue | Solution |
|---|---|
| Webhook not received | Verify URL is publicly accessible, check firewall rules. |
| Call immediately ends | Verify the destination number is valid and your Voice API application is properly configured. |
| Authentication error | Verify API key is correct and has proper permissions. |
| Number not working | Ensure your Telnyx phone number (from) is assigned to your Voice API Application. |
Record and Retrieve Call Recordings
Record Calls
You can enable call recording for Outbound Voice Profiles by configuring your Record Outbound Calls settings in the Mission Control Portal.
Alternatively, you can start call recording programmatically using the Start Recording API.
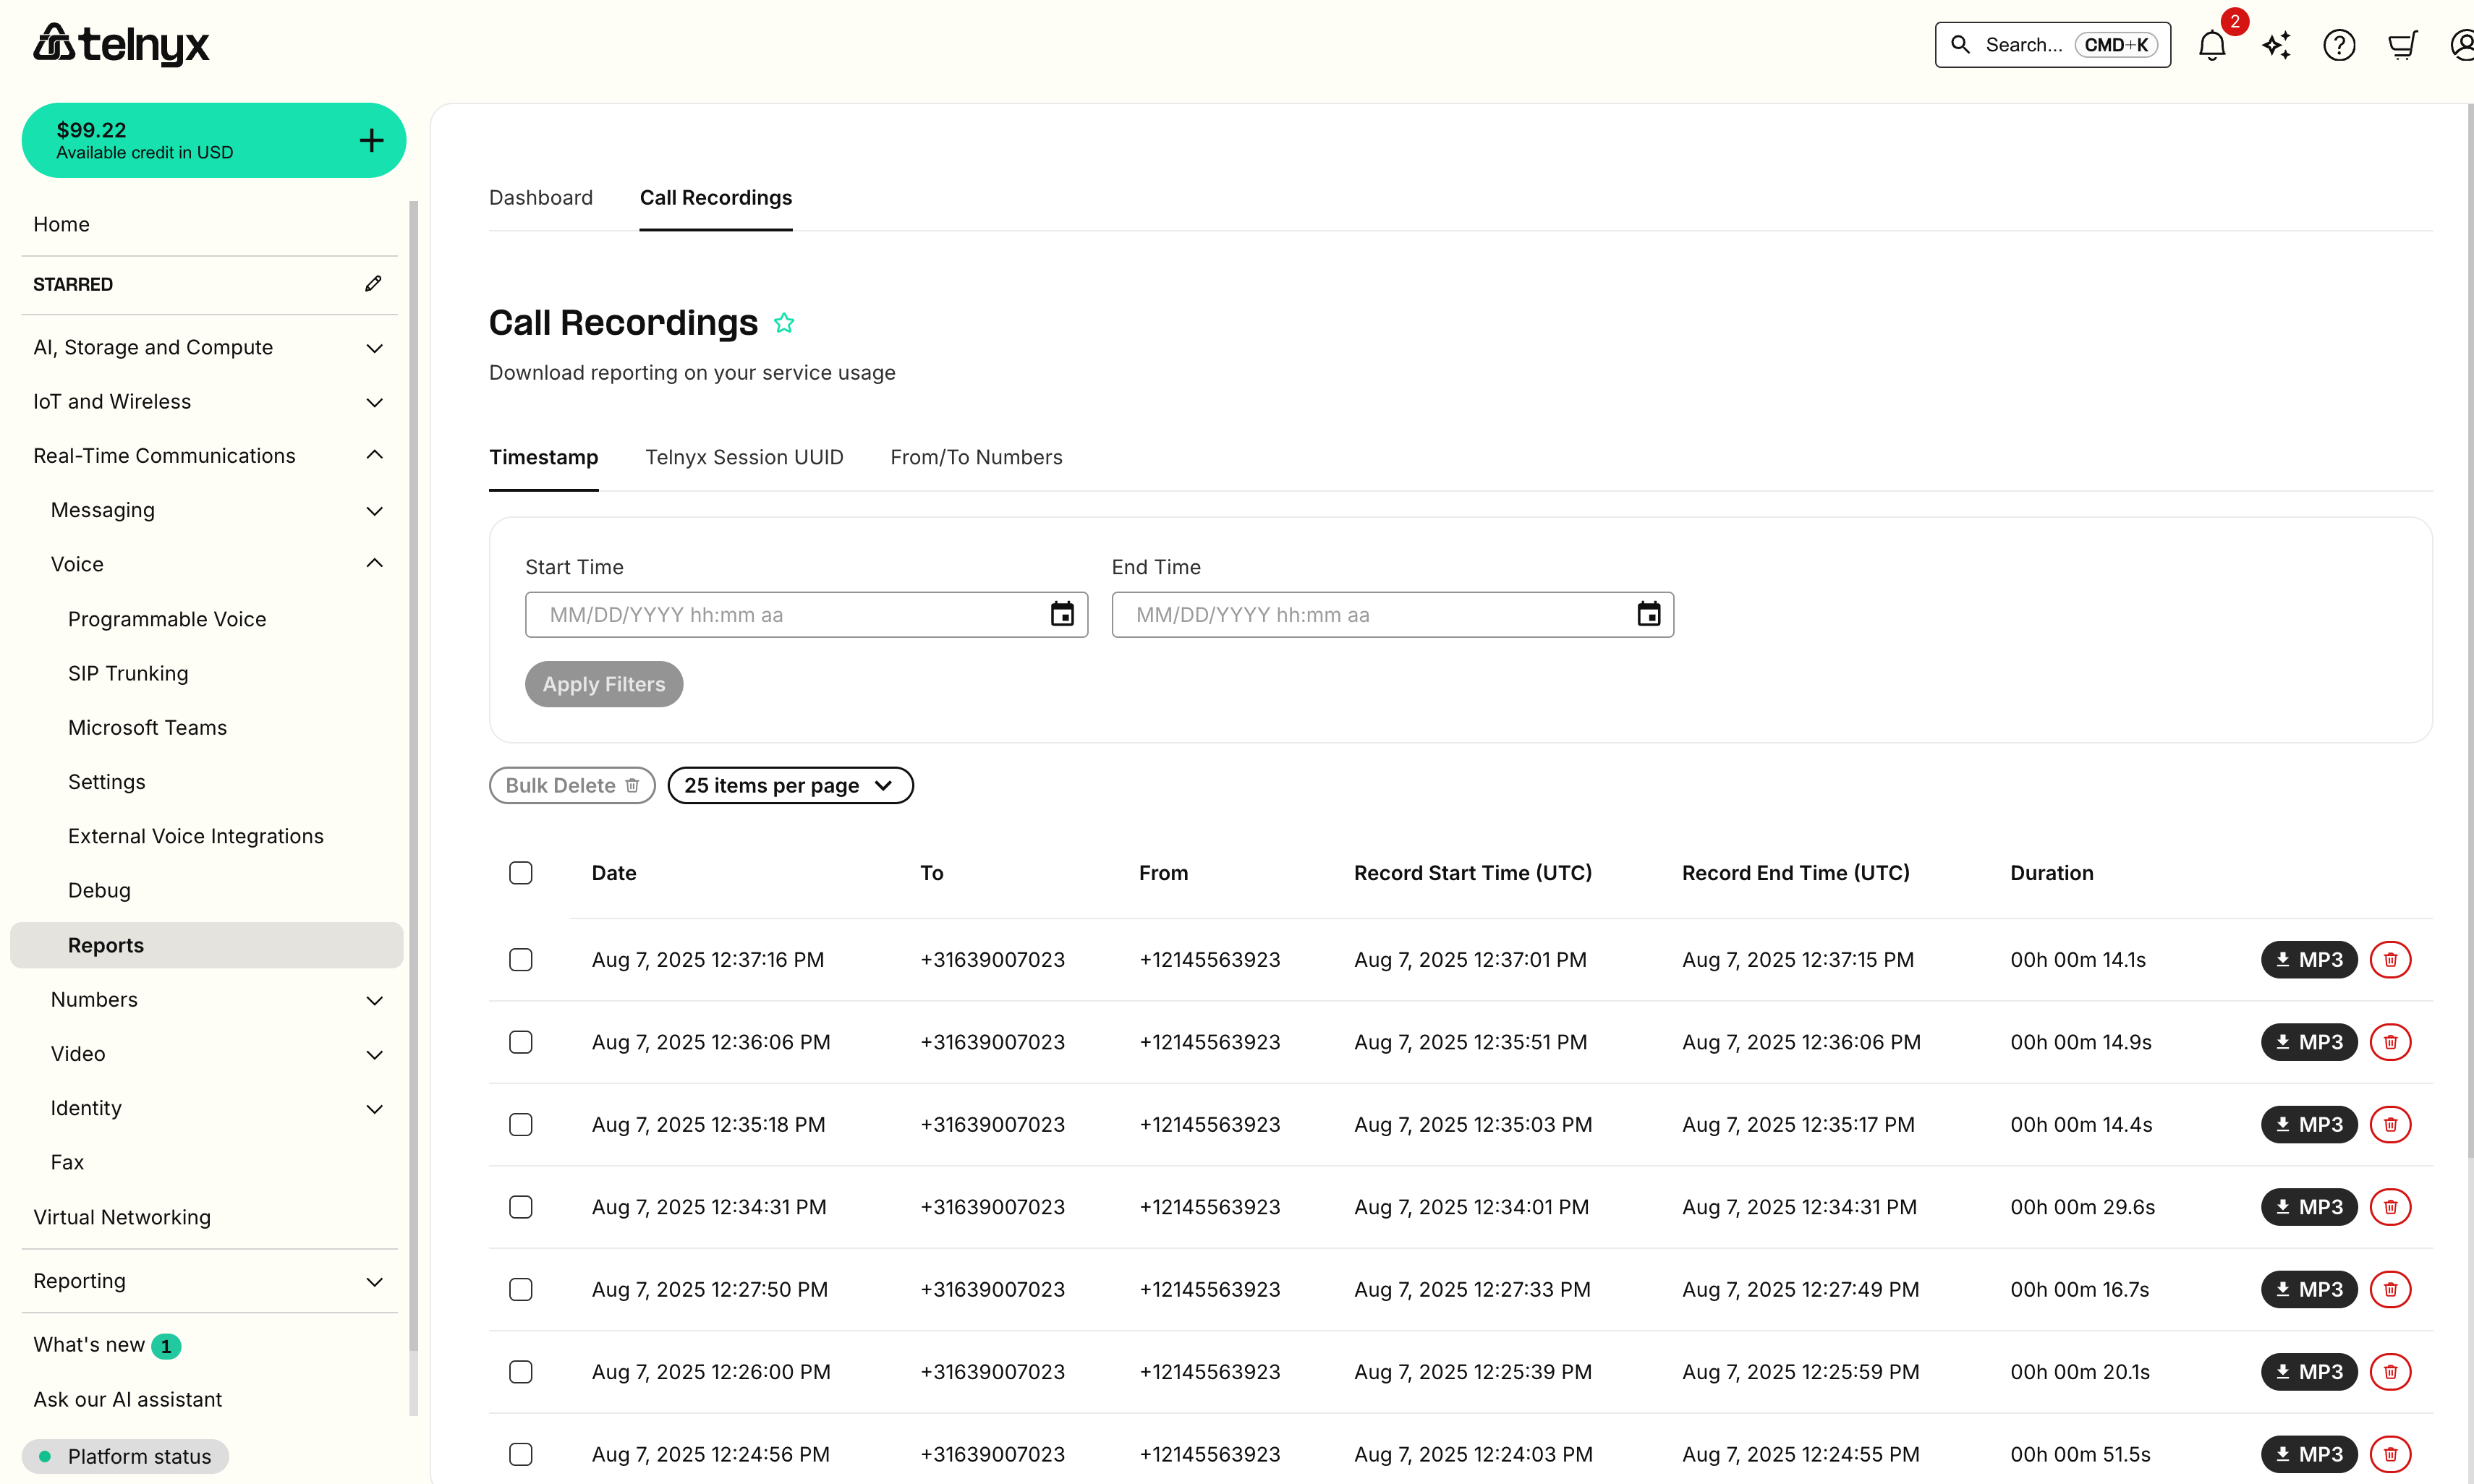
Retrieve Call Recordings
You can view and download your call recordings from the Call Recordings page in the Mission Control Portal.
Next Steps
Congratulations! You've successfully set up your first Voice API application. Here are some next steps to enhance your application:
Explore Advanced Features
- Voice API Commands & Resources: Learn about all available commands like transfer, conference, record, and more.
- Webhook Handling: Deep dive into webhook event handling and best practices.
- Text-to-Speech: Add natural-sounding voice synthesis to your applications.
- Speech-to-Text: Convert spoken audio into text for voice interactions.
- AI Assistants: Build intelligent voice assistants with natural conversations.
- Answering Machine Detection: Automatically detect and handle voicemail systems.
- Media Streaming: Stream real-time audio for advanced processing and analytics.
- TeXML: Use Telnyx TeXML to define complex call flows.
Try Our Tutorials
- IVR System: Build an interactive voice response system.
- Call Center: Create a call center application with queuing.
- Call Tracking: Implement call tracking for marketing campaigns.
Use Our SDKs
Speed up development with our official SDKs:
Resources & Support
Documentation
- Voice API Reference: Complete API endpoint documentation.
- WebRTC SDK Documentation: Build browser-based calling.
- Migration Guides: Moving from other providers.
Getting Help
- Support Center: Knowledge base and ticket support.
- Slack Community: Connect with developers and Telnyx team.
- System Status: Check service availability.
- GitHub examples: For code samples.
Ready to build something amazing? You now have all the tools to create powerful voice applications with Telnyx Voice API!